Showing posts with label Toyota. Show all posts

Thursday, November 14, 2013

Fix Toyota Tacoma Overhead Temperature & Compass Display


If you have a Toyota Tacoma with an overhead compass and temperature display that is not working, it is most likely do to a bad soldering joint on one, or possibly both of the 510 resistors on the main circuit board. It is a relatively easy fix if you are comfortable with a soldering iron and have about 10-20 minutes.  

Fix Toyota Tacoma Overhead Temperature & Compas Display
This is what the compass and temperature gauge should look like when fixed. To remove the overhead panel, drop the sunglass holder and remove the screw on the top of the panel. The front should only be held up by clips.   

Toyota Tacoma Overhead Temperature & Compass Display Does Not Work
Once the overhead panel has been removed and disconnected, remove the three screws holding the display on to the overhead panel. The tinted black cover can then be removed by releasing the clips holding it into place. You should then see the main circuit board. 

Toyota Tacoma Temperature & Compass Display
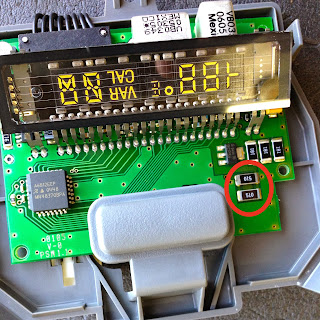
If you look closely you should be able to see the two 510 resistors.

Toyota Tacoma Temperature & Compass Display Repair
If you take a very small pic tool or needle, and apply a little pressure to the edges of the resistors you should notice they will start to lift off the circuit board. So what you want to do is re-solder these contact points. You will need to use a very small soldering tip and be careful not to use an excessive amount of solder. I've found that silver bearing "lead free" solder is a bit trickier to work with, so if you have any lead based solder laying around you may want to use it for this repair. If you have no way of getting your hands on a soldering iron and solder, you could try using a circuit writer pen.

Hope this helps!
Jeremy @ Car Audio Tips    


Tuesday, May 28, 2013

1995-2002 Toyota 4Runner Fog Light Installation Using Factory Fog Light Prewire

I recently installed aftermarket fog lights on a 2000 Toyota 4Runner (Third Generation). I was able to use some of the factory wiring that was already ran for optional factory fog lights.

1995-2002 Toyota 4Runner Fog Light Installation Using Factory Fog Light Prewire

Fuse Relay Wire Wiring Location For Factory Fog Lights Toyota 4Runner
Under the hood on the driver side, you should be able to locate the fuse/relay panel. The fog lights fuse/relay location are normally clearly marked on the top plastic cover. 

Fuse Relay Wire Wiring Location For Factory Fog Lights Toyota 4Runner
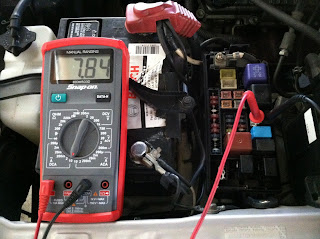
The fog light circuit is typically fused at 15 amps. If the vehicle didn't come equipped with the factory fog lights, there will most likely be no relay in the location. If you look at the relay location you will notice five female spade connectors. The two larger spade connectors on the right side are the ones I used (A and B. One should meter constant 12V, the other should meter continuity to the pink wires on the factory fog light harnesses.

Fuse Relay Wire Wiring Location For Factory Fog Lights Toyota 4Runner
The factory fog light harnesses should be taped up behind the bumper. On each side, they are pretty easy to find.

Fuse Relay Wire Wiring Location For Factory Fog Lights Toyota 4Runner
On the factory fog light harnesses you should have two wires
White/Black - Ground
Pink - Goes up to fuse/relay panel in engine bay (Positive)

1995-2002 Toyota 4Runner Fog Light Installation Using Factory Fog Light Prewire
If you connect your aftermarket fog lights, to the wires at the factory fog light harnesses. White/Black wires should connect to ground wires coming off the aftermarket lights, Pink wires should be connected to the positive wires coming off the aftermarket lights. Now when you jump terminals A and B at the factory fog light relay location, you should be able to power up your new fog lights. The fog lights I installed required about 8 amps of current with the vehicle off.

1995 1996 1997 1998 1999 2000 2001 2002 Toyota 4Runner Fog Light Installation Using Factory Fog Light Prewire
Now all I did was run two wires one from terminal A and one from terminal B, though the fire wall into the vehicle and connected them to an on/off switch.
  
1995 1996 1997 1998 1999 2000 2001 2002 Toyota 4Runner Fog Light Installation Using Factory Fog Light Prewire Wiring
You will always want to make sure to use a switch that is appropriately rated for this application. If I remember correctly I used a switch rated to handle 25 amps @12 Volts.
 Hope this helps!

Jeremy's Car Audio Tips    

Tuesday, April 30, 2013

2013 Toyota Corolla Trunk Pop Wiring (Non-SmartKey)


If you're going to be installing an aftermarket keyless entry/alarm system in one of these vehicles and want to tie in the power trunk pop you will need a SPDT relay.

2013 Toyota Corolla Aftermarket Alarm Trunk Pop

2013 Toyota Corolla Trunk Pop Wire
First locate the Pink trunk pop wire in the driver kick, it should be in a gray 22 pin harness (pin 20) and should meter 12v when the trunk pop button is pressed on the factory keyless remote. 

2013 Toyota Corolla Trunk Pop Wire Relay Wiring
You will need to cut the Pink trunk pop wire. Side A. of the pink wire should still meter 12v when the trunk pop button is pressed, and side B. shouldn't meter any voltage. 
Wire a SPDT relay as follows-

86- Constant 12v
85- Negative trigger from alarm/keyless system
30- Side B.
87a- Side A.
87- Constant 12v

Jeremy Car Audio Tips 2013 Toyota Corolla Trunk Pop
This will allow the factory trunk pop to operate as designed, until the aftermarket system triggers the relay. Then it will send 12v just to the motor side of the Pink truck pop wire. If you don't cut the pink wire, and just put a 12v trigger to it you will create a short circuit because that wire rests at ground.  Hope this helps!
Car Audio Tips
-Jeremy

Thursday, February 21, 2013

Upgrading Rear Speakers Toyota Camry With Factory JBL Sound System

If your upgrading the rear speakers in a Toyota Camry 2006-2011 (XV40) that is equipped with the factory premium JBL sound system, this tip may help. 

Toyota Camry Factory Rear Speakers
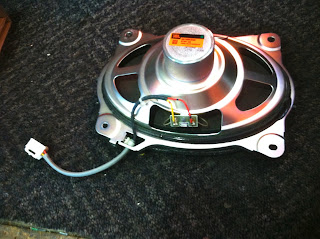
This is what the factory rear speaker should look like once removed.

Toyota Camry Factory Rear Speakers

Toyota Camry Factory Rear Speakers
As you can see there will be four wires pinned in the factory speaker harness.
You can easily identify the positive and negative wires by using a AA battery to pop the speakers, that is if the speakers are still functional. If you aren't familiar with how to test a speakers polarity with a AA battery, I will be explaining the process in a new post within the next day or two. 

Toyota Camry Factory Rear Speakers
 Once you have identified the positive and negative wires, for both the tweeter and the mid-range speaker cut the factory speaker harness off the factory tweeter and mid-range speaker. Leaving as much wire in tacked to the factory speaker harness as possible, you will need it to wire your new Alpine speaker.

Toyota Camry Factory Rear Speakers

Alpine Type E SPE-6090 Speakers
I will be replacing the factory speakers with these Alpine Type E (SPE-6090) aftermarket speakers.

Alpine Type E SPE-6090 Speakers
You will notice on most coaxial speakers the leads for the tweeter taped to the side of the magnet. 

Camry Rear Speaker Upgrade Alpine Jeremy
 In order for these speakers to work properly in these vehicles you will need to wire the tweeter and the mid-range independently. Because the output going to the factory tweeter and mid-range speaker is already crossed over, if you just connect one pair of the factory speaker wires to the new Alpine speaker you will either get just the high frequencies or just the low frequencies playing out of your new speaker, depending on what pair you connect. You can't just connect both pairs of factory speaker wires together to get full range, you would need some sort of summing module. I have already identified the wires in this vehicle "Red" wire is the mid- range speaker negative and the "yellow" is the mid-range positive. You can then cut the tweeter wires off the main terminals on the new Alpine speaker.  

Camry Rear Speaker Upgrade Alpine Speakers Jeremy Car Audio Expert
 The wire with the black stripe on the left of this Alpine speaker should be connected to the negative tweeter wire, which should be the "Black" wire coming off the factory speaker harness. Then connect the last wire which should be the "Green" wire coming off the factory speaker harness to the wire coming off the small capacitor mounted to the side of the Alpine speaker. 

Camry Rear Speaker Upgrade Alpine Speakers Jeremy Car Audio Expert
 If needed use a couple small zip ties to keep everything in place.

Toyota Camry Rear Alpine Speakers
 It's now time to plug the new Alpine speaker into the vehicle and secure it using some new mounting screws. Now just repeat the process on the other speaker, the factory wire color on the speaker harnesses should be the same on both sides.   

-Jeremy's Car Audio Tips
#car #audio #caraudio #toyota #jbl #12volt #sandiego

Wednesday, February 6, 2013

Retain Factory Aux Plug With Aftermarket Stereo.

If you are going to be changing out the factory stereo in a vehicle that is equipped with a 3.5 Aux plug located somewhere other than the stereo itself, you will typically lose the functionality of that Aux input plug unless you wire it to the new stereo. If you would like to keep the factory Aux plug functioning with the new stereo, you will first want to make sure you purchase a stereo with an audio Aux input on the back.

Toyota Tundra Jeremy Car Audio Expert
The vehicle I will be doing this on is a Second Generation Toyota Tundra.

Toyota Tundra Jeremy Car Audio Expert
Once you have got your new stereo, you will need to figure out if the audio Aux input on the back is a 3.5 plug or if it is left/right RCA audio plugs. The best thing to do is purchase a basic (3.5 aux to left/right RCAs cable) so you will have both types of connections. The picture above is what the cable will look like. I will actually need both ends for this install. The RCAs to run to the new stereo, and the 3.5 to identify the factory wires coming off the back of the factory Aux plug.

Toyota Tundra Jeremy Car Audio Expert
You will then need to cut the 3.5-RCA aux cable, making sure you have enough length on the side you will need to run to the back of the new aftermarket stereo. Then plug the 3.5 Aux side into the factory plug. 

Toyota Tundra Jeremy Car Audio Expert
 Now the easy part, you will need a continuity tester. Most multi meters should have the capability of testing continuity. Once you locate the wires on the back of the factory Aux plug, just test continuity between the wires on the back of the plug and the exposed wires coming off the cut 3.5 plug that should be plugged into the front. 

Toyota Tundra Jeremy Car Audio Expert
On this Toyota Tundra you would want to connect the wires shielding the smaller gauge red and white wires to the white wire coming off the back of factory Aux plug, because there is continuity between both them. You would then connect the other two wires using the same continuity test. The red wire goes to the black wire coming off the back of the factory Aux plug, and the white wire goes to the red wire coming off the factory Aux plug. 

Toyota Tundra Jeremy Car Audio Expert
This is a fairly easy process, that can also be used to hardwire audio into the back of the factory Aux plug. For example if you where keeping the factory stereo and you where installing an overhead, headrest monitors or a portable satellite radio. so you don't have an Aux cable showing to give it a cleaner look. 

-Jeremy's Car Audio Tips
#caraudio #12volt #sandiego #california #toyota #tundra 

Wednesday, January 16, 2013

99-04 Toyota Avalon Factory Sub Replacement.


If you are looking to replace the factory 8 inch sub in a 1999-2004 (second generation) Toyota Avalon, the "Kicker Comp 4ohm  Sub" is a good fit.

The sub cover/grill can be popped of very easily, it is held on with just clips in the front two corners.
.
 This is the factory subwoofer, it's a 3.7ohm 26w sub.
-Factory sub part# 86160-AC180-

 As you can see it fit almost perfect in the factory opening.

 You will need to use different mounting screws to hold the new aftermarket sub in place.
If the sub just needs a new foam surround, you can always just use a speaker repair kit!
Hope this helps!

-Jeremy's Car Audio Tips
#car #caraudio #12volt #sandiego

Monday, January 14, 2013

Toyota Tundra Factory Amp Bypass.

If you're installing a new stereo in your Toyota, you may need to get rid of your factory amp if the vehicle is equipped. The factory amp is located below the factory stereo in most Toyota's  

Toyota Aftermarket Stereo Factory Amp Bypass Jeremy Travis Vasquez

Toyota Aftermarket Stereo Factory Amp Bypass Jeremy Travis Vasquez Metra 70-1761
 These are the wire harnesses made to integrate an aftermarket stereo into the factory wire harnesses, Toyota has been using these same harnesses since the late 80's (Metra 70-1761). The factory wire harnesses that will be connected to theses will be located at the factory amp.

Toyota Aftermarket Stereo Factory Amp Bypass Jeremy Travis Vasquez
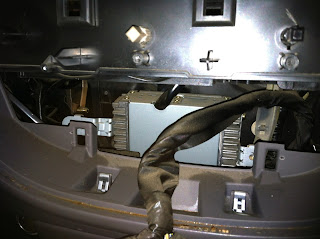
 The silver box with the heat sinks on the sides is the factory amp. It is normally mounted with several phillips screws.  
Toyota Aftermarket Stereo Factory Amp Bypass Jeremy Travis Vasquez

Toyota Aftermarket Stereo Factory Amp Bypass Jeremy Travis Vasquez Car Audio Tips
Use the harnesses on the bottom of the factory amp. They should fit and connect to the aftermarket Metra 70-1761 harness and allow you to bypass the factory amp.

Toyota Aftermarket Stereo Factory Amp Bypass Jeremy Travis Vasquez Car Audio Tips
You may be wondering why you would want to eliminate this amp. Well there are a couple of reasons. If the factory amp is bad, having to purchase and find another one can be expensive and not really worth it. You can buy a new aftermarket stereo with a built in amp, including all the bells and whistles, for around $100 and eliminate the factory amp. Or if you are planning on replacing the factory stereo with a new aftermarket stereo that doesn't have the proper pre out to integrate the factory amp, this will solve that problem as well. Lastly, you may get engine noise when integrating the new stereo into the factory amp. Removing the factory amp and powering the vehicles' speakers directly off the new car stereo will normally eliminate the noise issue. Hope this helps!

-Jeremy's Car Audio Tips
#toyota #caraudio #car #stereo Soundsystem #sandiego #amp

Sunday, November 25, 2012

2004-2009 Toyota Prius Quick Tip For Stereo Replacement.

If you are going to be taking on the task of replacing your car stereo in your 2004-2009 Toyota Prius, or maybe you are going to be installing an aftermarket car stereo for a customer in their 2004-2009 Prius. This is something you are gonna want to note. I have had several people contact me about problems they were having with their A/C controls, after they had their OEM car stereo replaced with an aftermarket one. This problem will occur if you do not use a 68ohm resistor to connect two wires in the 20 pin white harness removed from the OEM stereo. Just locate the white 20 pin harness behind the stereo, there will be two smaller gauge wires in pin 9 and 10. The wire in pin 9 should be a "Pink" wire, and the wire in pin 10 should be a "White" wire, get a 68ohm/1amp resistor. Strip back the insulation on both the Pink/White wires about 1/4in. and connect one side of the resistor to the "Pink" wire, and connect the other side of the resistor to the "White" wire. After you solder the connections cover and insulate with electrical tape. And that's it! 

If you need more info about dash disassembly just click the link bellow, it will take you to Metra's install guide for the Toyota Prius dash kit 99-8213.
Toyota Prius 99-8213 Info  

-Jeremy's Car Audio Tips

Wednesday, November 14, 2012

SImple Speaker Repair Solution For Toyota/Lexus Premium Car Audio Systems.

Does your speaker(s) in your Toyota/Lexus make an annoying rattling noise when the base is turned up, so you have to turn the base all the way down to avoid the unwanted noise. Or maybe a friend or customer has this problem? In most cases you can just replace the damaged speaker(s) with aftermarket speakers for relatively cheap. But sometimes it is not that easy because your vehicle has a "Premium" sound system like JBL or Harmen Kardon. These systems are designed differently from the basic systems. Most the time the speakers in these factory "Premium" car audio sound systems are uncommon sizes designed to reproduce certain frequencies and may also be wired in different configurations to achieve various loads being presented to the factory "Premium" amplifier(s). With all that being said, replacing these speakers will normally cost you an arm and sometimes both  legs, if not done correctly lol. So if the speaker is still moving, remove the speaker from the vehicle and check to see if the "surround" ring is ripped or torn, nine times out of ten it is. After you have identified the problem, get yourself a repair kit. They normally go for around $20-$40 and come with the two new "surround" rings and a small tube of glue. Now just follow the simple instruction and voila, problem solved. If you got any questions let me know, I normally charge about $80 to do this repair once you get the repair kit. So if your not conformable doing this yourself, contact your local car stereo shop, they should be able to handle this minor repair :)

This is a common problem with the Toyotas/Lexus speakers 


 Remove old "surround" ring

 Check out simplyspeakers.com for repair kitshttp://www.simplyspeakers.com/

-Jeremy's Car Audio Tips
#caraudio #tips #sandiego #speaker #repair #toyota #lexus