Showing posts with label Lexus. Show all posts

Friday, April 26, 2013

1998-2005 Lexus IS300 Main Amp Power Run Through Firewall To Rear


Toyota and Lexus vehicles are typically pretty easy to work on. Running cables/wires through the firewall to the rear is a pretty quick process. This is how I get my wires to the trunk.

Lexus IS300 Running Power Wire For Amp Through Firewall Into Car

Lexus IS300 Running Power Wire For Amp Through Firewall Into Car
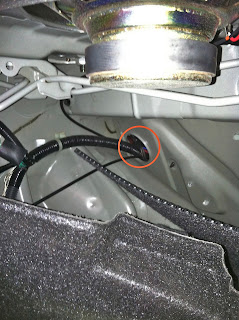
Once you locate the rubber grommet securing the factory wires through the firewall, look for an empty/hollow rubber sleeve/nipple. You can normally find one or two. You will want to cut the tip off, I normally use a pair of flush cuts.  

Lexus IS300 Running Power Wire For Amp Through Firewall Into Car
After the tip is removed, you should be able to gain access to the interior of the vehicle through that hole.

Lexus IS300 Running Power Wire For Amp Through Firewall Into Car
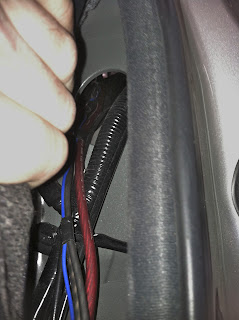
Now that you have the main power wire inside the vehicle, you should be able to easily run the power wire along with any additional wires under the plastic side panels to the back seat of the vehicle. Remember if you're installing an amp to power your Mid's and Hi's then you will want to run the RCA's down the opposite side of the power wire to avoid any unwanted noise. 

Lexus IS300 Running Power Wire For Amp Through Firewall Into Car
Once the wires are at the back seat,

Lexus IS300 Running Power Wire For Amp Through Firewall Into Car

Lexus IS300 Running Power Wire For Amp Through Firewall Into Car

Lexus IS300 Running Power Wire For Amp Through Firewall Into Car
Pull back on the seat, you should be able to see a big access hole to the trunk.

Lexus IS300 Running Power Wire For Amp Through Firewall Into Car

Lexus IS300 Running Power Wire For Amp Through Firewall Into Car
You should be able to easily fish the wires through to the other side, behind the liner in the trunk.

Lexus IS300 Running Power Wire For Amp Through Firewall Into Car
If I am installing a small amp, I typically mount it on the driver side rear panel in the trunk. This vehicle already had an aftermarket stereo, so I just installed an amp/sub. Hope this helps!
Car Audio Tips
- Jeremy 

Monday, March 4, 2013

Lexus SC Door Panel Removal.

I received an email recently asking about the removal of a door panel in a Lexus SC430 (Second generation). I just so happened to be doing a speaker repair on a Lexus SC this week, so I figured I would do a post on it. Although most of you may already now how to remove these door panels, this may help refresh your memory.  

Lexus SC Door Panel Removal

Lexus SC Door Panel Removal
 You can start by removing the triangle plastic trim in the top right corner of the door panel.

Lexus SC Door Panel Removal
There will be two plastic panel fasteners on the inner most side of the door panel. Push the center in with a small pick tool, then pull the whole fastener out.

Lexus SC Door Panel Removal
 Then remove the Phillips screw under the arm rest.

Lexus SC Door Panel Removal
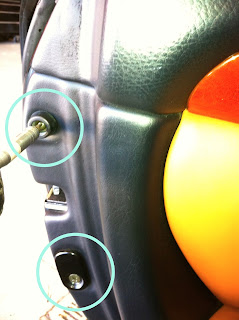
On the outer most side of the door, remove the two Phillips screws.

Lexus SC Door Panel Removal
 Along the bottom of the door panel, under the rubber weather strip there will be three more Phillips screws. Remove all three.

Lexus SC Door Panel Removal
 Remove the plastic cover behind the door handle.

Lexus SC Door Panel Removal
 There will be one Phillips screw behind the cover that must be removed.

Lexus SC Door Panel Removal
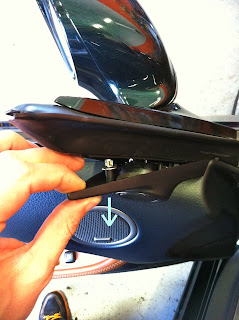
Taking out the power window/lock switches is a little tricky. You will want to lightly lift the edge with a thin panel removal tool. You will need to then use a small pick tool to push in the metal clip holding the plastic switch assembly in place. 

Lexus SC Door Panel Removal

Lexus SC Door Panel Removal
After the switch assembly is removed, extract the last Phillips screw.

Lexus SC Door Panel Removal
You will need to use a little force, and lift up on the door panel from the edge. It should lift up and off. Once the door panel is removed you will need to disconnect several connections in order to completely free the door panel from the door. Hope this helps! 
-Jeremy's Car Audio Tips

Wednesday, November 14, 2012

SImple Speaker Repair Solution For Toyota/Lexus Premium Car Audio Systems.

Does your speaker(s) in your Toyota/Lexus make an annoying rattling noise when the base is turned up, so you have to turn the base all the way down to avoid the unwanted noise. Or maybe a friend or customer has this problem? In most cases you can just replace the damaged speaker(s) with aftermarket speakers for relatively cheap. But sometimes it is not that easy because your vehicle has a "Premium" sound system like JBL or Harmen Kardon. These systems are designed differently from the basic systems. Most the time the speakers in these factory "Premium" car audio sound systems are uncommon sizes designed to reproduce certain frequencies and may also be wired in different configurations to achieve various loads being presented to the factory "Premium" amplifier(s). With all that being said, replacing these speakers will normally cost you an arm and sometimes both  legs, if not done correctly lol. So if the speaker is still moving, remove the speaker from the vehicle and check to see if the "surround" ring is ripped or torn, nine times out of ten it is. After you have identified the problem, get yourself a repair kit. They normally go for around $20-$40 and come with the two new "surround" rings and a small tube of glue. Now just follow the simple instruction and voila, problem solved. If you got any questions let me know, I normally charge about $80 to do this repair once you get the repair kit. So if your not conformable doing this yourself, contact your local car stereo shop, they should be able to handle this minor repair :)

This is a common problem with the Toyotas/Lexus speakers 


 Remove old "surround" ring

 Check out simplyspeakers.com for repair kitshttp://www.simplyspeakers.com/

-Jeremy's Car Audio Tips
#caraudio #tips #sandiego #speaker #repair #toyota #lexus