Friday, March 29, 2013

2003-2007 Chevy Silverado Double Din Indash Install Tip

If you haven't had a chance to install a double din in-dash stereo into a 2003-2007 Chevy Silverado, then you may find this tip helpful. 

Chevy Silverado Double Din Indash Install
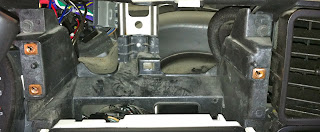
If you try to fit the stereo into the dash cavity as is, you will notice it will not fit correctly. 

Chevy Silverado Double Din Indash Install
Due to the form of the plastic dash supports the stereo will not go far enough back to allow for proper mounting, unless you remove some of these pieces.

Chevy Silverado Double Din Indash Install
Don't worry, you won't need anything more than a pair of angled pliers. I've seen other installers use different methodes, but I think this is the easiest way.

Chevy Silverado Double Din Indash Install
I normally begin by removing the two corner pieces, the plastic is quite brittle so you won't need much force. Be carful the broken edges will be very sharp.   

Chevy Silverado Double Din Indash Install
After I remove the corner pieces, I then remove the center suport. 

Chevy Silverado Double Din Indash Install

Chevy Silverado Double Din Indash Install
Once the removal of the interfering plastic is complete, I normally do on last thing... 

Chevy Silverado Double Din Indash Install
That is cover the rough edge with some duct tape, to avoid possible damage to any of the wiring and or your hand when managing any of the wiring when mounting the stereo.
Hope this helps - Jeremy's Car Audio Tips


Sunday, March 24, 2013

2004-2008 Nissan Maxima Stereo Removal Tip


As some of you may know the 2004-2008 Nissan Maxima (sixth generation) has a very brittle plastic panel that surounds the stereo. In some cases it will already have multiple hairline cracks not really visible to the naked eye, making it very difficult to remove without damaging if you don't know how to remove the panel correctly. 

Nissan Maxima Dash Removal
Once you remove the cover around the A/C controls, which is just held in by clips. Remove the two screws securing the A/C controls over the bottom lower piece of the dash panel. Lightly unclip the lower panel fasteners.

Nissan Maxima Dash Removal
These are the panel fasteners/clips holding the lower part of the dash panel in place. 

Nissan Maxima Dash Removal For Stereo Install
Then grab two wide flat panel removal tools and slowly insert them about 4-5 inches in, center of the A/C vents on each side. Be careful not to put pressure on the thin delicate dash trim. When inserting put any pressure required on the soft dash itself . If you don't have any panel removal tools about three inches wide you can use those cheap plastic putty knifes typically found at any local hardware store. Once you have your flat panel removal tools inserted, Open the top pocket and apply pressure to the inside walls of the pocket while pulling out to fully remove the dash panel.

Nissan Maxima Dash Removal For Stereo Install
These are the clips on each side that will get stuck if you just try prying the dash panel out.

Nissan Maxima Dash Removal For Stereo Install
 Now you should be able to get to the stereo, be careful putting the dash panel back in. Hope this help!
Jeremy's Car Audio Tips

Thursday, March 21, 2013

2005-2013 Corvette Accessory Power Location

If you're looking for switched accessory power in a 2005-2013 Sixth Generation Corvette (C6), you will probably want to go to the fuse panel. It's located on the passenger side underneath the floor carpet. 

Mini Auto Fuse Tap
If you haven't seen or used these fuse taps, they work great! 

Corvette Switched Accessory Power
You can tap into the "Heated Seats/Wiper" relay for accessory power. 

Corvette Switched Accessory Power
If you are going to need more than a couple amps of current I recommend wiring a relay.
-Jeremy's Car Audio Tips

Sunday, March 17, 2013

2008-2012 Chevy Malibu RAP wire.

You can normally find the Retained Accessory Power wire for the seventh generation Chevy Malibu's in the driver kick.
Chevy Malibu Car Audio

Chevy Malibu Car Audio
Just remove the driver kick panel and open the loomed wires coming out of the driver door. It should be a heavier gauge wire around 14 gauge (Yellow). You can use this wire to trigger amps, stereos, sat. radios, hands free systems, relays ect...
-Jeremy's Car Audio Tips

Wednesday, March 13, 2013

Pontiac G6 Stereo Install Into Factory Monsoon System


If your going to be installing a new aftermarket stereo in a Pontiac G6 equipped with a premium Monsoon sound system, you may find this tip helpful. The most common interface used to integrate an aftermarket stereo into this vehicles is the Scosche "GM13SR". 
Pontiac G6 Car Audio
  
Pontiac G6 Car Audio
What you may notice is the amp turn on wire, pinned in the GM13SR doesn't line up with the factory "Pink" amp turn on wire in pin location 6 of the factory harness. You will want to either repin the amp turn on wire in the GM13SR to line up with the factory amp turn on wire, or just jump the amp turn on wire form the GM13SR and splice directly into the "Pink" factory amp turn on wire. Hope this helps!
- Jeremy's Car Audio Tips

GMC Sierra Amp/Sub Install

This is a quick overview of an amp and sub install I did in a newer GMC Sierra (2009). The process should be the same, if not really similar for the newer Chevy Silverado. We kept the factory stereo intact, so we tapped into the factory sub for hi level.

GMC Sierra, Chevy Silverado Amp Sub Install

GMC Sierra, Chevy Silverado Amp Sub Install
A quick and easy way to run the main power wire: Near the battery, drop the power wire down and to the rear of the truck. Loom the wire and zip tie it away from any hot and or moving parts.

GMC Sierra, Chevy Silverado Amp Sub Install
There should be a small plastic grommet on the front passenger side, near the door sill.

GMC Sierra, Chevy Silverado Amp Sub Install
Under the plastic side covers, near the edge of the carpet you should be able to locate the grommet and drill a small hole to pull the main power wire through. You will want to make sure you seal the hole with silicone once the power wire is ran through.

GMC Sierra, Chevy Silverado Amp Sub Install
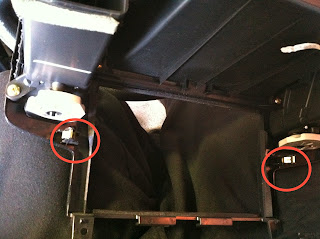
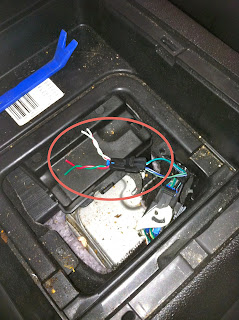
If you remove the the cup holders from the center consol, you should be able to get to locate factory sub wiring. The cup holders should be able to be removed with a panel removal tool, and is normally held into place with retainer clips. There will be two pairs of wires, because the factory sub is a dual voice coil. The first voice coil wires: (+ D.Blue~White / - L. Green Black) the second voice coil: (+ D.Green /  - L.Blue~Black). If the wiring is different and you can't determine the positive and negative of each voice coil, just tap into one voice coil for your hi level input.

GMC Sierra, Chevy Silverado Amp Sub Install
When I add an aftermarket amp/sub, like I did in this GMC Sierra I normally disconnect the factory sub.

GMC Sierra, Chevy Silverado Amp Sub Install
One of the easiest places to grab your amp turn on wire in these trucks will be under the steering column. You will notice a black plastic A/C duct. 
GMC Sierra, Chevy Silverado Amp Sub Install
On the side, you will want to remove the plastic fastener holding the duct in place.
Once the fastener is removed pull the plastic A/C duct out of the way.  
GMC Sierra, Chevy Silverado Amp Sub Install Switched Power
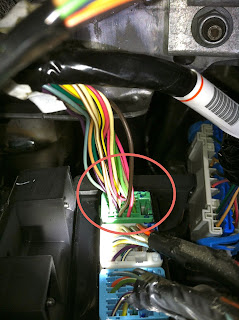
On the left hand side you should see about six harnesses lined up running vertically. In the top green harness there should be a Brown wire, that should be your switched "Accessory" wire. You can use this wire to power on your amp. You should always test your wires with a digital muti-meter before connecting anything.
    
GMC Sierra, Chevy Silverado Amp Sub Install Switched Power
Once you tap into the "Accessory" wire , I recommend fusing the new amp turn on wire just incase it becomes shorted. I normally put a 1AMP fuse inline.    
GMC Sierra, Chevy Silverado Amp Sub Install Switched Power
That's pretty much it, all that's left is running your wires to the amp location, grounding the amp and wiring up your sub(s). Hope this helps.
-Jeremy's Car audio Tips

Thursday, March 7, 2013

Hummer H2 Stereo Removal-Remote Start


If you're installing a new stereo or a remote start in a H2 Hummer, there is quite a bit of disassembly required. I actually did a remote start in this Hummer, but the process of disassembly is the same to get the stereo out.  


 You will first need to put the vehicle into 1st gear and remove the T15 (torx) from the shifter. Allowing you to lift up and remove the shifter out of the way.

With your panel removal tool release the clips on the cut holder/shifter panel. There should be three clips holding the panel on. You may have to apply quite a bit of force to get those clips to come free. 

 Under the cup holders you will need to remove the 10mm bolt.

Under the edge at the front of the center console there will be two 7mm screws, that need to be removed. 

 Open the center consol and take out the four Phillips screws holding the main liner of the center consol compartment in place. Then take out the plastic center consol liner.

 Under that liner will be four 10mm bolts that need to be removed.

You should now be able to pull the center consol back.

 Remove the two Allen bolts from the top of the main dash panel.


 You should now be able to free the main dash panel, allowing you axess to the stereo.


If you need to get to the main ignition wires for an alarm or remote start system, keep reading.
Remove the 7mm screw holding the edge of the plastic panel/knee bolster.

 There will be one Allen bolt on the right side of the steering wheel securing the gauge cluster shroud,  that needs to be removed.

Followed by two more on the panel to the left of the steering wheel, once the Allen bolts are removed you should be able to pull and remove this panel. There will be several clips on the top edge.

Then pull out and remove the gauge cluster shroud.

There should be another 7mm screw that needs to be removed, on the bottom edge of the plastic panel under the steering wheel.

You should then be able to release the two clips on the top edge of that panel, and gain access to all your main ignition wires.

This is what was left in this Hummer after the first attempted remote start installation, by another local shop. Lol, I won't say any names. 
Hope this help!

-Jeremy's Car Audio Tips.