Pages

Wednesday, January 30, 2013

Easy Way To Divide Voltage Using Resistors.

If you need to divide the voltage to wire LEDs, or maybe to integrate an aftermarket stereo into a Ford vehicle with a premium sound system. This diagram will show you how it can be done by using a couple resistors.    


Now before you wire anything using this method, you must consider how much current you will need to power your circuit. You MUST use resistors rated at the appropriate "Wattage" and "Resistance" to allow your circuit to function properly. I will provide a link below to a "Voltage Divider Calculator" so you can get a better understanding of the resistors you will need in order to accomplish what you want. If you have any questions let me know.

Calculator

-Jeremy's Car Audio Tips

Wednesday, January 23, 2013

Chevy Sonic 20 Minute Amp Sub Install.


If you're installing an amp for a aftermarket sub in a Second Generation Chevy Sonic, you're in luck! These vehicles are a breeze.

Amp Subwoofer Install Chevy Sonic Jeremy Travis Vasquez

Amp Subwoofer Power Wire Install Chevy Sonic Jeremy Travis Vasquez
The battery is located on the driver side, under the hood in the engine bay. Right behind the battery you will see a large rubber grommet on the firewall, you can punch right threw that to run the main power wire into the cab of the vehicle. Be sure to avoid the main wire harness that goes threw that same rubber grommet! There should be plenty of room to run your power wire threw without coming close to those wires.

Amp Subwoofer Hi-Lo Install Chevy Sonic Jeremy Travis Vasquez
If you are going to be keeping the factory stereo, the rear speaker wires are located in the driver kick panel. You can connect your line out converter/hi-lo converter to these wires. The speaker wires should be twisted, and should read about 4.2ohms on your multi meter. The rear left speaker positive should be "Green" & Negative should be "Green/Black. The rear right speaker positive should be "White" & Negative should be "Blue/Black"  

Amp Tune On Wire Chevy Sonic Jeremy Travis Vasquez
You can grab your remote/amp turn on wire at the cigarette outlet plug. 

Amp Tune On Wire Chevy Sonic Jeremy Travis Vasquez
If you remove the bottom plastic piece in the cup holder, you can easily access the wires coming off the back of the cigarette outlet plug. They will be loomed in clothe tape. The "Purple/Yellow" should be the positive, and can be used to power your amp on/off with the ignition switch. You should always double check with multi meter just to make sure you have the right wire(s).

Switched Power Amp Turn On Wire Chevy Sonic Jeremy Travis Vasquez
Once you run all your wires to your amp, find yourself a good ground.

I found a good ground right under the edge of the trunk liner. I attached a ground wire to the hollow metal support that raps around the opening of the trunk, closest to the rear fold down seats. Always double check to make sure there isn't anything that may be damaged by the screws used to mount and secure your ground wire. You will also want to remove the paint with a wire brush or sand paper, in the location you will be mounting your ground wire.

Connect your sub(s) and you're done! And you didn't even have to remove the factory stereo! 
Hope his helps.

-Jeremy's Car Audio Tips
#caraudio #car #electronics #sandiego #chevysonic #amp #install


Monday, January 21, 2013

Turn Cigarette Outlet from Constant 12V Into Switched 12V.

It's becoming more common for vehicles to come equipped with cigarette outlet plugs that don't turn off with the ignition switch. I recently had someone who didn't want his cigarette outlet to stay on all the time, and this was what I did using a standard SPDT Relay.  

This was done on a 2010-2012 Ford Fusion. Under the dash on the left side, above the driver kick panel you will see the small fuse panel. To the right of that there will be a gray harness with a 14-16 gauge Purple/Green wire, that should be the "Switched 12 Volt Accessory Wire". When you test it with a digital multi meter it should read 0 when the key is off, 12 volt in the acc. position, 12 volt in the run position, but should shut off and read 0 during crank. This diagram will work on pretty much any vehicle, the difference will be finding the "Switched 12 Volt Accessory Wire". Most of the time you can find it coming off the ignition switch, but the colors will vary. To note, it doesn't matter what wire you interrupt coming off the cigarette plug, It will work using either wire.

-Jeremy's Car Audio Tips
#caraudio #car #electronics #sandiego #12volt

Wednesday, January 16, 2013

99-04 Toyota Avalon Factory Sub Replacement.


If you are looking to replace the factory 8 inch sub in a 1999-2004 (second generation) Toyota Avalon, the "Kicker Comp 4ohm  Sub" is a good fit.

The sub cover/grill can be popped of very easily, it is held on with just clips in the front two corners.
.
 This is the factory subwoofer, it's a 3.7ohm 26w sub.
-Factory sub part# 86160-AC180-

 As you can see it fit almost perfect in the factory opening.

 You will need to use different mounting screws to hold the new aftermarket sub in place.
If the sub just needs a new foam surround, you can always just use a speaker repair kit!
Hope this helps!

-Jeremy's Car Audio Tips
#car #caraudio #12volt #sandiego

Tuesday, January 15, 2013

02-Up Ford Expedition Tip For Retaining Overhead DVD Player When Installing Aftermarket Stereo.

If you are going to be installing an aftermarket stereo in a 2002-Up Ford Expedition you may want to check to see if the vehicle is equipped with a factory overhead DVD player. If it is, you may want to purchase a "factory overhead retention harness". If you don't, and  just leave this secondary harness as is the factory overhead will not work.

Depending on factory stereo system in the vehicle, will depend on the harness you will need. For most 2002-2004 Expeditions the Metra 70-5520AV will work, for  most 2004-2006 Expeditions non-navigation the FRD03-DVD will work, if the Expedition is equipped with a "Can-Bus" system you will need the FRD04-DVD. If you want the overhead audio to play threw the new stereo system, I would recommend getting a aftermarket stereo with rear audio inputs. Otherwise you will have to adapt the RCA's to a 3.5 Aux and connect it to the face of the stereo, assuming your new stereo has at least a audio Aux input on the face. Well, hopefully this helps!

-Jeremy's Car Audio Tips
#car #caraudio #tips #12volt #sandiego

Monday, January 14, 2013

Toyota Tundra Factory Amp Bypass.

If you're installing a new stereo in your Toyota, you may need to get rid of your factory amp if the vehicle is equipped. The factory amp is located below the factory stereo in most Toyota's  

Toyota Aftermarket Stereo Factory Amp Bypass Jeremy Travis Vasquez

Toyota Aftermarket Stereo Factory Amp Bypass Jeremy Travis Vasquez Metra 70-1761
 These are the wire harnesses made to integrate an aftermarket stereo into the factory wire harnesses, Toyota has been using these same harnesses since the late 80's (Metra 70-1761). The factory wire harnesses that will be connected to theses will be located at the factory amp.

Toyota Aftermarket Stereo Factory Amp Bypass Jeremy Travis Vasquez
 The silver box with the heat sinks on the sides is the factory amp. It is normally mounted with several phillips screws.  
Toyota Aftermarket Stereo Factory Amp Bypass Jeremy Travis Vasquez

Toyota Aftermarket Stereo Factory Amp Bypass Jeremy Travis Vasquez Car Audio Tips
Use the harnesses on the bottom of the factory amp. They should fit and connect to the aftermarket Metra 70-1761 harness and allow you to bypass the factory amp.

Toyota Aftermarket Stereo Factory Amp Bypass Jeremy Travis Vasquez Car Audio Tips
You may be wondering why you would want to eliminate this amp. Well there are a couple of reasons. If the factory amp is bad, having to purchase and find another one can be expensive and not really worth it. You can buy a new aftermarket stereo with a built in amp, including all the bells and whistles, for around $100 and eliminate the factory amp. Or if you are planning on replacing the factory stereo with a new aftermarket stereo that doesn't have the proper pre out to integrate the factory amp, this will solve that problem as well. Lastly, you may get engine noise when integrating the new stereo into the factory amp. Removing the factory amp and powering the vehicles' speakers directly off the new car stereo will normally eliminate the noise issue. Hope this helps!

-Jeremy's Car Audio Tips
#toyota #caraudio #car #stereo Soundsystem #sandiego #amp

Sunday, January 13, 2013

BMW Mono Amp Install!

Installing an aftermarket Amp to power a Sub(s) in most BMW's is actually one of the easiest installations, if you know what your doing. Since you can pretty much find everything in the trunk, the install is less time consuming because all the wire runs are relatively short runs assuming you want all your gear in the trunk. The factory Amp is normally located in the trunk behind the trunk liner on the driver side. If you're keeping the factory radio you can normally tap into the factory subwoofers here for your hi level input to your aftermarket amp. 

BMW Aftermarket Amp Subwoofer Installation Jeremy Travis Vasquez
 You can also normally find the factory 12v amp turn on wire here as well and use it to turn on your new aftermarket amp . In this BMW the amp turn on wire was "Black" sometime it will be a different color like "white" or "blue" so always double check and test with a meter. When testing for the factory amp turn on wire keep in mind most the time the amp turn on wire in BMW's will have a shut off delay. Meaning the wire will stay 12v for about 30-60 seconds after the key is removed and the door has been opened.

BMW Aftermarket Alpine Amp Subwoofer Installation Jeremy Travis Vasquez
After you tap into the factory sub wires and grab your amp turn on wire from the factory amp. Run them to the new aftermarket amp location avoiding anything that could possibly damage the new wires. The main power wire can be attached to the battery which will normally be located in the trunk on the passenger side behind the plastic cover. Once you find a good grounding point attach your ground and run both wires to the new aftermarket amp as well.  

BMW Aftermarket Alpine Amp Subwoofer Installation Jeremy Travis Vasquez
 Once all your your connections are made and the subs are connected, your ready to tune your new amp! 

BMW Aftermarket Alpine Amp Subwoofer Installation Jeremy Travis Vasquez
Once properly tuned and mounted, enjoy!

-Jeremy's Car Audio Tips
#bmw #amp #sub #caraudio #soundsystem #sandiego 

Monday, January 7, 2013

Retaining "Trip" Button when replacing Stereo In Nissan Maxima.

If you're going to be replacing the car stereo in a 2000-2003 Nissian Maxima, you may or may not mind losing your steering wheel controls that control your factory stereos volume, seek, and mode. To retain the steering wheel controls with the new aftermarket stereo you will need to purchase a steering wheel control integration module (SWC). They normally run about $60-$110. Regardless you will want to follow the next step to maintain full functionality of the "Trip" button.   


  It is actually a very easy fix. All you have to do is ground the Brown/White wire in pin 11

and you will retain the "Trip" button, allowing you to cycle through the trip info. If you do not ground this wire you will lose functionality of the "Trip" button.  

-Jeremy's Car Audio Tips
#nissan #maxima #caraudio #car #electronics #tips #sandiego

Thursday, January 3, 2013

Quick Tip When Replacing Stereo In An Older BMW.

If you are going to be replacing the factory stereo in a late 90's early 2000 BMW, you may find this tip useful!

BMW Car Stereo Replacement Tip Jeremy Travis Vasquez
This is a BMW Z3

BMW Car Stereo Replacement Tip Jeremy Travis Vasquez
 Time to switch out this ancient thing!

BMW Car Stereo Replacement Tip Jeremy Travis Vasquez
The stereo is very easy to remove. Once you remove the little plastic covers on the left and right sides of the factory stereo, losen the small screws and the stereo will slide out.

BMW Car Stereo Replacement Tip Jeremy Travis Vasquez
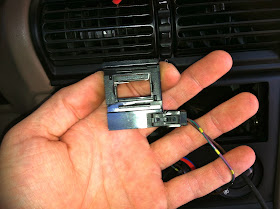
You will notice a plastic back support braket with a hole in it. Mounted to the back will be a switching mechanism with two wires coming off it.  

BMW Car Stereo Replacement Tip Jeremy Travis Vasquez
 This little guy will cause some head ace if left as is. It will cause problems with the alarm/keyless entry system. What you will want to do is cut the Purple/Green wire and cap each end off. 

BMW Car Stereo Replacement Tip Jeremy Travis Vasquez
And that's it! Hope this tip helps!

-Jeremy's Car Audio Tips
#bmw #caraudio #car #electronics #tip #sandiego

Wednesday, January 2, 2013

97-01 Jeep Cherokee Double Din Car Stereo Installation.
I recently installed a Double Din car stereo into a Jeep Cherokee, I think it came out pretty nice! Normally these vehicles will only fit a din or din and a half sized car stereo. But with a couple custom modifications your in business.  

This is what the factory stereo looked like, way outdated! lol

1997-2001 Jeep Cherokee Double Din Car Stereo Install Jeremy Travis Vasquez
When you remove the factory stereo, grab the new Double Din stereo and put it up to the opening. Take note of the plastic pieces that are blocking the new Double Din from fitting in properly. The plastic in all four corners will have to be cut in order for the new stereo to fit properly. 

1997-2001 Jeep Cherokee Double Din Car Stereo Install Jeremy Travis Vasquez
Moving on to modifying the dash panel. You will want to mock the stereo up from the back and try and get a good idea of how you want the stereo to fit. Filing the dash panel opening to fit your new Double Din size stereo can be very tedious and time consuming! To speed up the process and make the install a lot easier, you may want to invest in a "Dremel" or what I used, an air powered "Mini Belt Sander". Don't try and rush when filing the dash panel. You want all the lines to be nice and straight and you don't want to opening to be too big. Frequently check to make sure your getting the proper fitment.

1997-2001 Jeep Cherokee Double Din Car Stereo Install Jeremy Travis Vasquez
Just about done with the filing.  
1997-2001 Jeep Cherokee Double Din Car Stereo Install Jeremy Travis Vasquez
Perfect fit! Besides the gaps on the sides that will be filled with ABS plastic once the new Double Din stereo is mounted in the dash.

1997-2001 Jeep Cherokee Double Din Car Stereo Install Jeremy Travis Vasquez
Getting the new Double Din stereo to fit is a little tricky. I used an air saw and first cut the bottom corner pieces of plastic out. *Note, the bottom pieces of plastic cut out were pieces of the a/c - heater duct and must be sealed off after cutting. Once the bottom was taken care of, I cut the top corner pieces as well. Cutting the top pieces was quick and easy and did not require anything to be sealed. After you get it to fit nicely in the dash you will want to get it positioned so when the dash panel is put back on the new stereo will sit perfectly in the new Double Din opening. I used metal "Back Straps" to secure the stereo in place on the left and right side.

1997-2001 Jeep Cherokee Double Din Car Stereo Install Jeremy Travis Vasquez
Once the new stereo is mounted in the dash you can work on filling the gaps on the dash panel. I used ABS plastic, and a paintable/sandable plastic filler. Once you get the gaps filled, give it a quick paint job. 
1997-2001 Jeep Cherokee Double Din Car Stereo Install Jeremy Travis Vasquez
And that's it! I didn't mention any of the wiring of the harness I figured that step is pretty straight forward. You now have a nice New Double Din stereo! Good luck, if you have any questions shoot me an email...

-Jeremy's Car Audio Tips
#caraudio #car #electronics #custom #jeep #cherokee