Tuesday, June 11, 2013

BMW E46 Double Din Aftermarket Stereo/Indash Installation


I recently did an installation of a double din in-dash stereo into a BMW M3 (E46). The installation went very well and sounded great.

Factory BMW M3 E46 Double Din Indash Stereo
This is what the factory BMW M3 stereo looked like. 

New Parrot ASTEROID Smart Multi Media Stereo BMW E46 M3
I went with the new Parrot ASTEROID Smart multi media stereo, I was VERY IMPRESSED!!
Check out the link below for more info.

New Parrot ASTEROID Smart Multi Media Stereo BMW E46 M3
Do to the depth of this particular double din stereo, the installation will be a lot easier then installing a standar double din.

Behind Factory Stereo In BMW E46 M3
You will not have the depth to fit a standar double din stereo, unless you modify and cut some of the components that get in the way behind the factory stereo. That is why this Parrot stereo worked out so well.

Double Din Dash Kit For BMW M3 E46
You will need some parts for this installation, starting with the double din dash kit. Here are some places you can find one.

Metra 70-9003 Wire Harness
For the factory amp integration you can use the Metra 70-9003 wire harness.

Metra 40-EU10 Antenna Adapter
You will also need the Metra 40-EU10 antenna adapter in order to use the factory antenna.  

20 Foot Antenna Extension
Along with the antenna adapter you will need a 20 foot antenna extension, Metra 44-EC240
Another part you may want to take into consideration is a "Steering Wheel Control" interface.

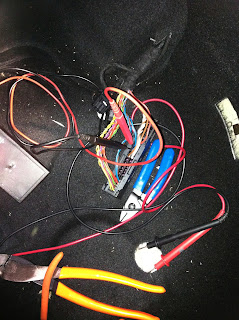
In the trunk of the vehicle on the driver side, under the trunk liner you should find the stereo tuner. The antenna plug will be located on the top corner, you will want to disconnect it and use the EU-10 to adapt it to a universal Motorola plug.

On the bottom corner you will see the reverse 70-9003 harness, disconnect it and use the 70-9003 harness to integrate into the factory amp. You will then want to extend the wires off the 70-9003 metra harness and run all the wires up behind the new stereo, including the 20ft antenna extension that you will want to connect to the (Motorola Side) of the antenna adapter. Make sure you connect your Blue/White amp turn on wire. You will want to use the (high) speaker level outputs off the back of the new Parrot stereo and connect them to the input wires you extended from the trunk. All speaker wires should be CEA color coded for easy identification. The power wires you will need to find and connect separately using a digital multi meter.
I hope this helps!

- Jeremy's Car Audio Tips


Wednesday, June 5, 2013

2013 Volkswagen Passat Retaining Factory 3.5 AUX Plug With Aftermarket Stereo


If you're going to be upgrading the factory stereo in a 2013 Volkswagen Passat, and replacing it with an aftermarket stereo. You will typically lose functionality of the factory 3.5 AUX input in the center consol, unless you integrate it. It's pretty easy, you will want to make sure the new aftermarket stereo have a AUX input on the rear. That way you will not see any wires running to the face of the stereo. 

2013 Volkswagen Passat Retaining Factory 3.5 AUX Plug With Aftermarket Stereo

2013 Volkswagen Passat Retaining Factory 3.5 AUX Plug With Aftermarket Stereo

2013 Volkswagen Passat Retaining Factory 3.5 AUX Plug With Aftermarket Stereo
The three AUX wires should be in a blue 12 pin harness, that is part of the main factory stereo harness.

2013 Volkswagen Passat Retaining Factory 3.5 AUX Plug With Aftermarket Stereo Wiring
The wire should be:

Left Positive - Yellow
Right Positive - Gray
Ground/Common - Green

3.5 Aux Cable Wire Guide Diagram Left Positive Right Positive Ground
Once you have identified your wires in the vehicles, you will want to identify the wires in the 3.5 AUX cable you will be using. After you do that connect the wires, plug in the 3.5 AUX to the back of the new stereo and you should be good to go...
Hope This Helps!

Jeremy's Car Audio Tips

Porsche Carrera 4S Aftermarket Stereo Install Factory Amp Bypass


I recently installed an aftermarket stereo and amplifier into a 2003 Porsche Carrera 4S, it was a pretty easy install. If you are going to be working on one of these vehicles, this may help you out.

Porsche Carrera 4S Aftermarket Stereo Install Factory Amp Bypass

Porsche Carrera 4S Aftermarket Stereo Install Factory Amp Bypass
The factory amp should be located on the driver side of the storage compartment under the hood, right next to the spare tire.

Porsche Carrera 4S Factory Amplifier location Wiring Bypass
Once the spare tire is removed you should have easy access to the two 10m bolts that secure the metal braket holding the factory amp in place. I fully bypassed the factory amp and installed an aftermarket in its place.

Porsche Carrera 4S Factory Amplifier location Wiring Bypass
At the factory amp there should be 6 pairs of speaker wires, 2 pairs going to the front dash speakers, 2 pairs going to the front door speakers, and 2 pairs going to the rear speakers. There should also be a heavier gauge pair going to the factory subs if equipped. The front dash speakers, and the front door speakers should meter 2ohms each when testing the speaker wires at the factory amp. The rear speakers should meter 4ohms each. The factory subwoofers if equipped, behind the seats will typically meter 1ohm each (single voice coil). They are normally wired in parallel, so at the factory amp the pair of wires for the subs will meter 1/2 ohm. Depending on the aftermarket amp you are installing, you may need to rewire the subs in series to bring the load up to 2ohm.

This should be the wire colors-

Front Left Dash Positive - Yellow
Front Left Dash Negative - Yellow/Brown
Front Right Dash Positive - Red
Front Dash Right Negative - Red/Brown
Front Left Door Positive - Green
Front Left Door Negative - Brown/Green
Front Right Door Positive - Purple
Front Right Door Negative - Brown/Purple
Rear Left Positive - Blue
Rear Left Negative - Brown/Blue
Rear Right Positive - Blue (Pin 13-14)
Rear Right Negative - Brown/Blue

Once I had my speakers and subs all wired I ran power from the battery, which is only about 5 feet away. I Then grounded the amp, and ran my RCA's and amp turn on/stereo ground wires to the new stereo. 

Porsche Carrera 4S Factory Amplifier location Wiring Bypass
There should be a rubber grommet on the driver side firewall, where you can run your wires through.

Porsche Carrera 4S Aftermarket Stereo Install Factory Amp Bypass
Behind the factory stereo you should have a 12V constant wire on the factory stereo harness. I used that and the ground I ran from the same grounding point as the new aftermarket amp, to try and eliminate the possibility of engine noise. You will however need to run switched power from the fuse panel (driver side kick), or tap into switched power directly off the vehicles ignition switch. DO NOT MISTAKE THE VSS WIRE FOR SWITCHED POWER ON THE FACTORY STEREO HARNESS.
Hope This Helps!
Jeremy's Car Audio Tips